Is Better!

Dool

Backyard Bodger
Staff member
Distributor
Developer
477 Owner
Well I am either going to make a Big Fool out of myself( likely :confused:) or the,

Biggest Himalayan ever!
Here is the Barrel,

IMG_20231201_161446.jpg
And to fill that "Hole"
IMG_20231201_161544.jpg
And to top it of,
IMG_20231201_122241.jpg
A bigger Combustion Chamber with Bigger Valves( like 37 and 39.5(might check that!) with the seat cut to suit and the Ports matched and "Enlargened".
IMG_20231201_171011.jpg
Not much room for an oversize but I do have a thicker Liner as back up, this is the Top Veiw ( siera Vista?)
IMG_20231201_180415.jpg
The back up plan, a bit more Meat here!
17014474351886177518378453901111.jpg
Inlet has been made shiny and bigger.
IMG_20231201_122315.jpg
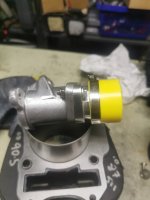
Manifold is going to be attached to a 37mm Throttle Body.
IMG_20231202_004013.jpg
I found it in amongst my spare parts when looking for something else! the only concern is I thought it was on my 443 :unsure:.
Got a back up plan for the airfilter as well.
IMG_20231202_004324.jpg
Thanks to @barima I also have.,
IMG_20231202_004553.jpg
A Spacer, Lazer cut or somesuch which made from Aluminum should not slow me down much.
So by the time this is fitted the Cam will be some,,,
IMG_20231202_004649.jpg
6mm Vertically away from where it normally sits! :rolleyes:
17014510019237227501979871156393.jpg
So a Cam Chain with 2 extra Links is required.
@barima again(y)

a crowd. funding site could be set up but they would skim too much so just PayPal my email account, I don't wish to make a Big deal out if it:cool:X2
 

Attachments

  • 17014480779684655791777683334605.jpg
    17014480779684655791777683334605.jpg
    2.4 MB · Views: 47
  • 17014480313922271529149492147990.jpg
    17014480313922271529149492147990.jpg
    1.9 MB · Views: 54
  • IMG_20231201_171011.jpg
    IMG_20231201_171011.jpg
    1.5 MB · Views: 55
Giving the word "modding" a whole new dimension. waiting for the acceleration tests :cool:
 
Ring End Gap set to 14 top and 18 second

IMG_20231201_162824.jpgIMG_20231201_165014.jpg
This simple tool is up to the task and cheap.
 
Last edited by a moderator:
As luck would have it, I have run into some hurdles.
The 4 Main Head Bolts are now about 6mm too short, so a 19mm end mill tool bit has been ordered to adjust for the discrepancy :cool:.
The 2 6mm studs on the Cam chain side are also too short so must be removed also.
I hope the Exhaust is long enough :)
 
And on the what ever day of Xmas the courier gave to me, 19mm end mill.

IMG_20231228_104503.jpg
 
Last edited by a moderator:

Sinking the Bolts is easier than getting longer ones I figure. ;)
 
Last edited:
Of course a Flywheel Puller is required to remove the Magneto/Flywheel, so I ordered one local, then in a spate of pessimism ordered another off ebay from India ;)
Ebay came thru before Christmas but it was for a Bullet and clearly marked as such!
To the credit of the ebay seller the correct one was located( been sent in error to another customer) and posted after the break and ariived a week ago.
No word from the local dealer and I thought the Indian was stuffing me around:unsure:
So off comes the Flywheel and the Woodruff key shows signs of failure, not sheared but 1/3 the way.
IMG_20240111_100058.jpg
Both surfaces of the Taper show a copper sulphate green that wiped off!
Manual specifically makes mention of how clean this is supposed to be.
It is after all the friction that holds the Flywheel in place, the Woodruff key just locates it.
IMG_20240111_121948.jpg
There is a timing mark inside the case, I don't have dial for this yet.
Going up has its drawbacks but they are mostly overcome now, the hollow dowels and the side bolts were too short of course,
IMG_20240111_115903.jpgIMG_20240111_130942.jpg
Barrel held down and Deck Height checking!
A step that you ignore at your peril, especially if you have not widened the combustion Chamber!
Head gasket is OEM cut to size (ie a bit bigger than the Bore šŸ˜Ž
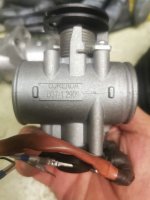
), if you have seen the original you will know this is perhaps asking a bit.
IMG_20240111_100804.jpg.17049500314304817029223827793487.jpg
Thanks for the Hurry up @barima
 
Last edited:
Now that Deck Height is confirmed do the Valves hit the Piston?


IMG_20240111_132048.jpg
 
Gets pretty close on the Exhaust side.

IMG_20240111_153727.jpg

IMG_20240111_163951.jpg
Perhaps this will help.
 
I had missed this post entirely!

@Dool you're the man!!!

This is pretty close to finish!!!
 
All good fun, this goes on the Mill tomorrow, I damaged the thread on the end of the Crank and had to cut off a bit ;) to get it started so now I need to cut the boss back a bit also :cool:IMG_20240111_174254.jpg
3 or 4mm should be enough :rolleyes:
 
make good use of that 19mm endmill!!!
I needed a diameter larger than 19, this was done with a Fly Cutter? then the Dremmel ;)
Hopefully less damage than a Valve hitting it.
 
I had missed this post entirely!

@Dool you're the man!!!

This is pretty close to finish!!!
The name hid the post, I didn't want to attract attention, less people see this the less see me fail.
 
Measurements are important as is progress ( famous last words!), so in their absence I decided I needed about 4mm taken from the Flywheel boss to get the required amount of thread.
This would have been made in a Lathe of some sorts but mine is too small to hold it comfortably so I bolted it to my Milling machine after some deliberations, talking into account that my limitations may far exceed the cost of having it done by a professional, yet the money they would want was big and my time cheap enough to waste and a new one would be cheap enough anyhow ;)
IMG_20240112_093119.jpg

Using an 8mm end mill bit I cut about 0.25mm down and took about 1.5mm cuts across a 32mm diameter.
3mm took forever šŸ˜• and getting the Swarf off was a challenge in itself.
IMG_20240112_173324.jpg

But the result appeared acceptable.

IMG_20240112_174646.jpg

Then I reinstalled it and actually tightened it up ( as I should have done before deciding it needed machining) using a High tech E-Wrench it went a bit further and hey presto I have some thread to spare. :whistle:
Here is the aforementioned E-Wrench.

IMG_20240112_182621.jpg

It is made more accurate with the addition of a special Socket.

IMG_20240112_183015.jpg

Cheap and double Hex! how much Torque could it take?

IMG_20240112_182735.jpg

Look carefully and you can see the marks made by the Socket, I dont know what it means :)

The battery was at half power if that is important :ROFLMAO:
 
Last edited:
The Moral of that story is,

when taking off the Flywheel with the Puller always leave the nut on the shaft so it doesent Flare!
Saves a lot of trouble :cool:
 
The RE special tool that would enable a Tension wrench to be used effectively is.

part number S-T 27534-2 ( magneto and rear sprocket holding tool ) I wrongly used a 3/8 cordless Rattle gun and am prepared to take the consequences :cool: )

The Magneto/Flywheel puller is S-T 27530-2 ( magneto rotor puller ) I tried a 3 jaw cheapo and then in a vain attempt to reinforce it failed again and eventually decided to do something else while I waited almost patiently for the correct part to arrive.

I have ordered a 1/2" Digital Tension Wrench that covers the complete range of Torques in the Manual, some new nuts and Woodruff keys, eventually I will be able to Hold the Flywheel and Tension it to specs;) But I am not waiting!
 
The name hid the post, I didn't want to attract attention, less people see this the less see me fail.
So far I'm not seeing that coming! :)
 
Back
Top